

NetSuite Video Tutorial: How To Create a New Vendor Record in NetSuite
Whether you are just getting started at a new company, recently received a promotion, or simply need to learn some new skills for your shifting job...
2 min read
 NetSuite’s Purchasing module is simple to use and effective. Track your vendors’ information, purchase orders, bills, and payments with ease.
The first thing you’ll have to do is get an administrator to enable A/P at Setup>Company>Enable Features. This gets NetSuite ready to track your vendors and vendor bills. If you want to use the purchase order function too, enable the “Purchase Orders” function in the same window on the “Transactions” tab.
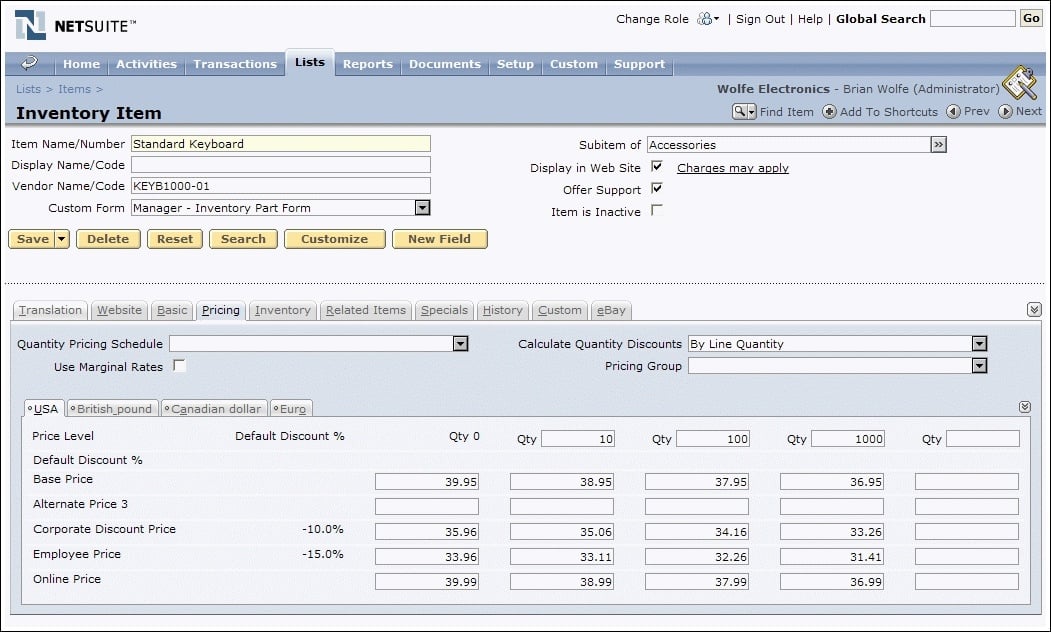
Before you can enter your first purchase order, a vendor record has to be created. Let’s say your vendor is the local office supply store, Al’s Supply Hub. Navigate to Lists>Relationships>Vendors>New and start entering the basic information for Al’s Supply Hub in the fields provided. Click Save.
Next, we can start entering a purchase order. Go to Transactions>Purchases/Vendors>Enter Purchase Orders. Where it asks for a vendor, you can now enter Al’s Supply Hub. Depending on your automated numbering settings, a PO# will either be generated by NetSuite or you can manually enter it here.
On the Items tab, enter an item from your NetSuite inventory list that you would like to replenish. Perhaps you’re ordering some more #2 pencils? Enter that item here, the quantity you would like to purchase, and the expected purchase rate. Please note that the item must be created prior to adding it to a purchase order.
If you’re not using NetSuite’s inventory module, keep reading and I’ll show you a way to skip the purchase order process and just use bills to enter expenses.
On the address subtab, enter or choose an address of your vendor. Then save and print the Purchase Order to create a PDF which you can send to your vendor.
This purchase order and other open/unreceived purchase orders can be found at Transactions>Purchases/Vendors>Receive Purchase Orders. From this screen you can also drill down into each purchase order for further review, or mark purchase orders received in bulk.
By receiving a purchase order in NetSuite, you’re now able to enter a bill against that purchase order. The list of received purchase orders waiting to be billed can be found at Transactions>Purchases/Vendors>Bill Purchase Orders or you can drill into the individual purchase order and click “Bill” to create the vendor bill.
The bill will automatically bring over the items and vendor information which you entered at the purchase order level so there’s no need to enter the same information twice. You can also make changes to the vendor bill prior to saving if the bill does not match your purchase order for some reason.
If you elected not to use Purchase Orders in your process, you can still enter stand-alone vendor bills at Transactions>Purchases/Vendors>Enter Bills. This would be the way to go if, for example, you are not using NetSuite inventory and just want to enter purchases expenses directly to the appropriate General Ledger account on the “Expenses” subtab of the new bill window.
Once you’re satisfied with your bill, click save.
Now you’ll have an open payable which you can track with NetSuite’s various out-of-the-box A/P reports at Reports>Vendors/Payables. For example, choose the A/P Aging report to show which vendor bills are still unpaid and how long they’ve been open.
The final step in this process is to pay the vendor bill. You can do this in bulk or individually depending on your and your company’s preference. Pay the bill at Transactions>Vendors/Payables>Pay Bills. Drill down into individual bills in this list to write a check to the vendor through NetSuite. Or, if you prefer, check off several bills at once and click “Save.” This will create a check to each vendor whose bills you’re paying.
If you’re not paying the bill in full right now, you can enter a smaller payment amount prior to saving. The bill will remain open in your A/P register so you can fully pay later on.
Contact us with any questions or problems you may have and we’ll be more than happy to help you use NetSuite purchasing.
Whether you are just getting started at a new company, recently received a promotion, or simply need to learn some new skills for your shifting job...

Tapping into NetSuite's Amazing Resources and Training Opportunities Can Boost Your NetSuite IQ, and your companies competitive advantage. We like to...
NetSuite is a powerful cloud-based ERP system that provides businesses with a comprehensive suite of tools to manage their operations. One of the...
